⚠️ Important – Read before enabling SSO
When you enable Single Sign-On (SSO), it is enforced for all users of your account.
This means:
All users must be able to authenticate via the same Identity Provider
All users must have an account under the same verified company domain
Please verify the following before enabling SSO:
All users use a corporate email address (for example:
@yourcompany.com)No users are using personal email addresses such as
@gmail.com,@hotmail.com, or similarEmail aliases (for example
user+1@company.com) are not supported and will not work with SSO
⚠️ Once SSO is enabled, users who do not meet these requirements will no longer be able to log in.
Make sure all users are correctly configured before activating SSO.
To set up Single Sign-On (SSO), log in to the Partner Dashboard and go to:
Settings → scroll to the bottom → Single Sign-On → Manage SSO configurations
Select an SSO protocol
Choose the protocol your Identity Provider uses. This determines the configuration steps.
SAML (recommended for Microsoft Entra ID)
XML-based standard commonly used for enterprise web applications.
Use SAML for:
Microsoft Entra ID (most common setup)
ADFS
Shibboleth
Other enterprise identity providers
OIDC (OpenID Connect)
Modern protocol based on OAuth 2.0 for web, mobile, and API authentication.
Use OIDC for:
Google
Okta
Auth0
⚠️ Although Microsoft Entra ID also supports OIDC, most Microsoft SSO integrations use SAML.
The steps below describe SAML with Microsoft Entra ID.
Step 1 – Create and configure the application in Microsoft Entra ID
Go to the Microsoft Entra admin center
Navigate to Microsoft Entra ID → Enterprise applications
Click New application
Select Integrate any other application you don't find in the gallery
Enter a display name and click Create
After the application is created, go to the Manage section and select Single sign-on
On the Select a Single sign-on method page, choose SAML
On the Set up Single Sign-On with SAML page, select the pencil icon next to Basic SAML Configuration
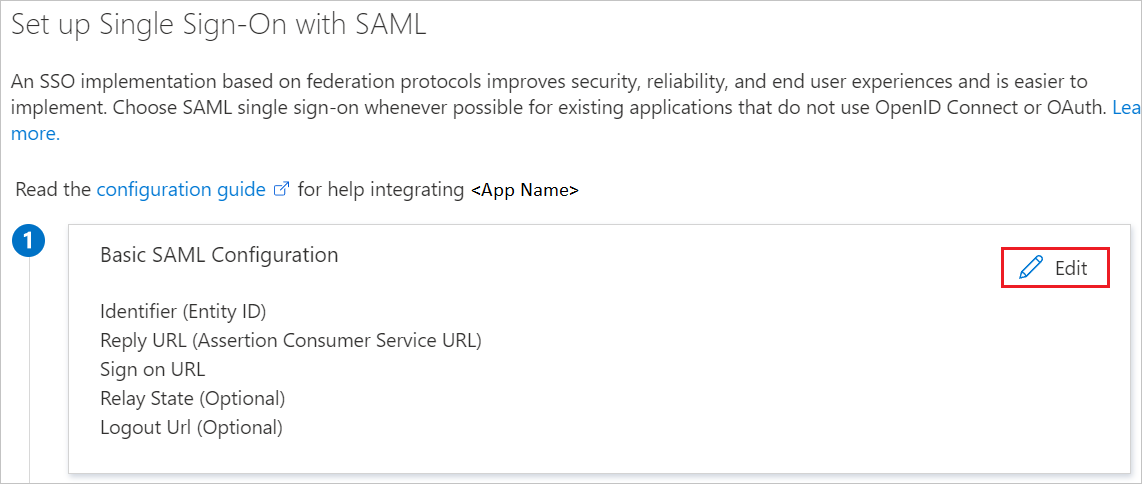
Enter the following values:
Identifier (Entity ID)urn:amazon:cognito:sp:eu-central-1_iQh4WAUkO
Reply URL (Assertion Consumer Service URL)https://jifeline-user-pool-prd.auth.eu-central-1.amazoncognito.com/saml2/idpresponse
Step 2 – Download Federation Metadata XML
Go to SAML Signing Certificate
Download the Federation Metadata XML
Step 3 – Configure SAML in our platform
After completing the Microsoft Entra ID configuration, configure SAML in our platform.
SAML Configuration
Name
Enter a name for this SSO configuration (for example: Microsoft Entra ID SAML).
Email Attribute Name
Enter the attribute name configured in Microsoft Entra ID that identifies the user.
⚠️ This value must exactly match the attribute configured in Microsoft Entra ID.
Metadata Source
Select how you want to provide the Microsoft metadata:
Metadata XML
Upload the Federation Metadata XML file downloaded from Microsoft Entra ID.
Metadata URL
Paste the metadata URL provided by Microsoft Entra ID.
Either option can be used. The Metadata XML option is most commonly used.
Step 4 – Complete the setup
Save the configuration in our platform. After saving, the SSO configuration is not active yet. To activate SSO, toggle Enabled to on.